Page Contents
The Choices
- Flow phenomenon: Water boiling? Faucet dripping? Why does it look like that?
- Visualization technique: Add dye? See light distorted by air/water surface?
- Lighting: Continuous? Strobe? Sheet?
- Photography
A: Framing and Composition
B: Cameras
C: Lenses
D: Exposure
E: Resolution - Post processing: Creating the final output. Editing: at least cropping the image and setting contrast.
Here we’ll talk about lenses for your camera and how lenses in general work, including how they are specified; features like zoom, focal length, and field of view; what focus is; some shorthand optics rules that govern lenses; and macro photography. If you want more information about how to use or specify other types of optics, the Edmund Scientific Application Notes are a good place to start
Reading the Lens Specs
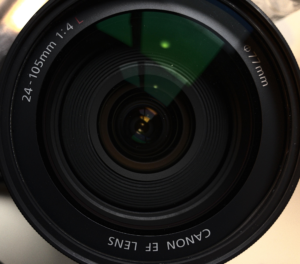
Take a moment and look at the front of your lens, or look at Figure 1. Check out the numbers. What do they mean?
First, let’s decode the numbers. Lenses are specified by focal length and maximum aperture, or f number. Let’s start with focal length. In Figure 1, the range of focal lengths that the lens can be set to is 24 to 105 mm. When decoding the numbers on a lens, a dash usually means the lens is a zoom lens, and the focal length can take on a range of values. Zoom lenses are standard now, but in the past they cost more than a lens with a single, fixed focal length. Nowadays a fixed-focal-length lens is called a prime lens, usually is high quality, and costs more than a zoom.
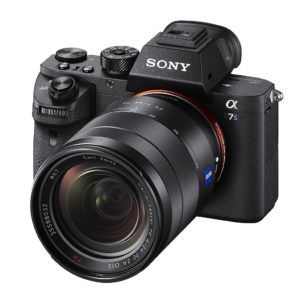
The maximum aperture can be specified a number of ways: a ratio like the 1:4 in Figure 1; an F or f/; or just a plain number with values usually between 1.4 and 6. The f number is actually the focal length divided by the diameter of the lens: f/d. In Figure 2, the ‘4/24-70’ means that the f number for maximum aperture is 4 and the focal length range is 24 to 70. The only way to tell that is by the magnitude of the values, and the fact that the big numbers have a range and the small one doesn’t since the aperture may or may not take on different values as the focal length changes. If it does, it will show up as a range. On a more ‘professional’ lens, the max aperture won’t change with focal length. Another useful number you may see on a lens is accompanied by a diameter mark, a circle with a slash through it or a Φ, as in Figure 1. This is the diameter of threads at the front of the lens. If you want to add a filter on the front, this thread diameter will tell you what size to buy. If you see a similar mark on a camera body, that tells you where the sensor plane is.
If you are working with plain glass elements, not camera lenses, they are probably not labeled. Here’s a trick to measure the focal length: put the lens in direct sunshine, and measure the distance to where the sun’s image is a sharp point on the ground.
Focal Length, Zoom and Field of View (FOV)
You might think focal length is how long the lens is physically, and it’s true that lenses with a long focal lengths are often physically long as well. Some lenses can be really long, like half a meter from one end to the other! They usually have lots of lens elements, (i.e., curved pieces of glass), but they combine, in effect, into one lens specified by a single focal length at any one time, (theoretically anyways.) The reality is a bit more complex, so the sunshine method doesn’t work well for measuring focal length for a camera lens.
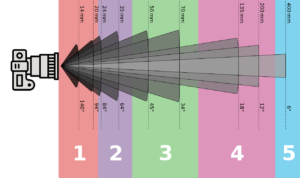
Once upon a time, common cameras used 35-mm film, and they came equipped with a 50-mm lens by default (a.k.a. a ‘kit’ lens), so f = 50-mm became a standard that other lenses are compared to. Lenses were ‘long’ or ‘telephoto’, with a narrow field of view (FOV) if they had f > 50-mm, or ‘wide angle’ if f < 50-mm. Figure 3 shows lens nomenclature and the relative FOV. For comparison, humans can see a vertical FOV corresponding to a 22 mm lens, but since human vision is complicated, perspective issues made 50-mm a more popular choice for a human-equivalent view . Nowadays, because the FOV depends on the sensor size as well as the lens focal length, lenses are often specified by a ’35-mm equivalent’. So if you have a phone camera with a 1/2.3 inch sensor, a 9-mm focal length lens could be listed as 50-mm equivalent — without bothering with the ’35-mm’ part — and will give you the same FOV that you’d get with a full-frame 35-mm sensor and a 50-mm lens. There are a number of online calculators to do the math for you to calculate equivalents .
Lens Compression
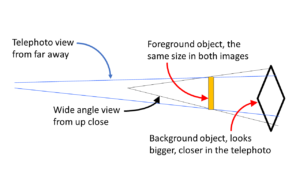
Besides FOV, there is an additional impact of focal length on framing: telephoto or lens compression. This refers to the way the relative size of foreground and background subjects changes with zoom, as shown in Figures 4 and 5:
Figure 4: As zoom increases, background objects appear larger in relation to foreground objects. Mike Smith via Youtube.
Hands on! Do this now!
Pick up your camera and zoom in on an object in front of you. Note the relative size of something beyond it, in the background. Then walk in close, and zoom out until the foreground object is the same size in the viewfinder as it was in the previous image, and notice how the size of the background object got smaller.
Focus
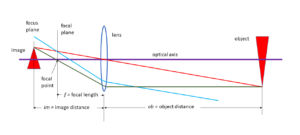
An image of an object is ‘in focus’ when light coming from a point on the object passes through a lens and converges again at the focal point, as shown in Figure 6, which we’ll examine in greater detail below. We’re not going to go through all the Snell’s law calculations for why a spherical lens will bend light like this, but the result can be summed up in a few lens laws . These will be very handy in understanding how lenses work, which you’ll need in order to exploit the finer points of lens behaviors while avoiding their pitfalls. Again, know your tools.
Lens Laws
- Light through the center of a lens is undeflected.
- Light parallel to the optical axis goes through the focal point.
- All light entering the lens from a given direction ends up collected to a point in the focal plane.
- Lens focus equation: 1/f = 1/im + 1/ob
Lens Law 1 is illustrated in Figure 6 by two light rays: the optical axis shown as a purple line and the red line from the tip of the object. Both pass through the center of the lens without bending. For Lens Law 2, you need to know that the focal point is on the (purple) optical axis, one focal length f from the lens. The green light ray is parallel to the optical axis, and both pass through the focal point. This will be true for all light entering parallel to the axis. Law 3 extends that idea to all light entering from a given direction; it will map to a single point in the focal plane, which is a surface one focal length away from the lens. As an example, the blue line enters the lens parallel to the red line, and they intersect the focal plane together.
You can use the first two laws to derive the fourth, the focus or lensmaker’s equation . The red and green lines come from the tip of the object, and reconverge behind the focal plane, in the focus plane, where the image is formed. Any point in the object plane maps to a point in the focus plane to form the whole image. Ideally you want to place your sensor there, in the focus plane. The distance from the lens to the image, im, is thus a function of the focal length f and the object distance, ob. If the object is far away, at infinity, the focus plane coincides with the focal plane, which is why the sunshine trick works. As the object comes closer to the lens, the focus plane moves back, away from the lens. In a camera, you are holding the sensor plane fixed, and the lens has to move out away from the sensor to bring a close object into focus. If you play with diagrams like this, you’ll also see how the size of the image grows as the object distance gets smaller. The ratio of the size of the image to the size of the object is the magnification m; if the image is twice the size of the object m=2, but a camera lens gives an m much smaller than that because there’s a limit to how much magnification you can get. The closest object you can focus on depends on how far away you can place the lens from the sensor, which is determined by the mechanics of the lens barrel. There are some tricks to get around this limitation; we’ll see those in just a little bit.
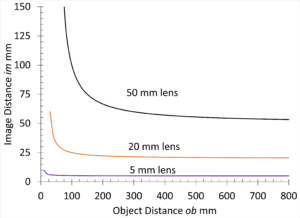
Figure 7 shows how im and ob are related by the lens focus equation, Law 4, at least for object distances greater than one focal length, which is all any camera lens allows. Notice how short lenses have to move only small amounts in order to focus at almost any distance, making cell phone cameras nice and slim; this is also why small cameras with short lenses can take such great macro photos. Also notice how object distances greater than 10 focal lengths all have the same image distance of one f; once an object is ‘far’ from the lens, it doesn’t matter how far away it gets, your lens won’t have to move to keep it in focus.
Macro Photography
In flow vis, we are often taking photos of small phenomena with details a few inches in size. In order to make these subjects fill the frame, we want to focus closer than the ordinary lens barrel mechanics will allow us. Here are several techniques we can use to accomplish this .
Macro Lens
First, of course, you can buy a prime macro lens that is specifically designed for close-up photography, if you have a lot of money. Don’t worry, there are several very cost-effective alternatives.
Extension Tubes
Extension tubes are simply spacers that go between the lens and the camera body, that physically move the lens away from the sensor, thereby allowing the object to be placed closer. Inexpensive versions are just spacers, but a slightly more expensive version will have electronic pass-through circuits, so your autofocus and image stabilization lens functions will work. Even with pass-through circuits, a third-party set of three stackable tubes are still only $20.
Close-Up Lenses
Not to be confused with a macro lens, a close-up lens is a single lens element that screws on the end of a regular lens. For a typical 52 mm thread diameter, you can get a set of four close-up lenses for as little as $10. Since you are introducing another lens element, you will probably lose 10% of the light entering the camera, and potentially more via smudges or scratches. Close-up lenses are not specified by focal length per se, instead they are specified in diopters , like eye glasses. A diopter is 1/f in meters; a +2 diopter lens has a focal length of 500 mm; the plus means it’s a convergent lens. Close-up lens sets typically have +1, +2, +4 and +10. The 1/ formulation is handy because the resulting focal length is 1/ftotal = 1/f1 + 1/f2 so if you work in diopters you can just add the values to get the resulting focal length in diopters. For example, if you have a 50-mm lens, and add a +2 diopter lens on the front, you now have a 45-mm lens, and the effective image distance stays almost the same, allowing the object to be moved closer. Close-up lenses have threads on their fronts too, so you can stack them together for more power.
One really nice thing about close-up lenses is they don’t actually have to fit onto your lens. You can just hold them out in front of your phone camera, or your point-and-shoot camera. It’s best to keep them parallel to your lens, so you might want to make a plastic or cardboard tube to hold them in place.
Reverse Macro Adapter
Another inexpensive ($8) way to get a larger image distance is to flip the lens around. A reverse macro adapter threads on the outer end of your lens, and has a bayonet connector that mates with the camera body. If you then add extension tubes as well, you can get magnifications up to 4x! But be careful, because the fragile inner surface of your lens is now exposed. Also, your autofocus is not designed to work this way, so it’s best to disable it for this technique (if your adapter has pass-through circuits.)
Macro Homework
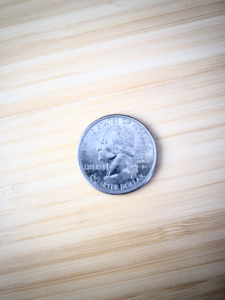
Homework Exercise: Try this for all your cameras and lenses. Make an image of a 25₵ coin. At what lens settings do you get the greatest magnification, where the coin is as large as possible in the image and still sharply in focus? Can you get the most magnification by zooming out and moving close, or by zooming in and moving back? At which extreme can you focus closest?
Example: Iphone 8. I used the Halide photo app; it has a macro mode that provides 3x digital zoom so I could see the focus accurately. It also has a ‘focus peaking’ feature that highlights areas in focus, but I found it less accurate than judging the digital zoom by eye. Zoomed out, moved close: the closest object distance was around 3.24 inches. I uploaded the DNG raw image into Darktable, my current editing software, and used the crop feature to measure the width of the coin image in pixels. The coin in the image occupied 1090 pixels out of the 3024 pixel width of the image = 36% of the image. The actual sensor size took a little digging to find but it is 6.29 x 4.29 mm. The image size was 0.36 x 4.29 mm = 1.54 mm. The actual diameter of the coin is 24.3 mm, so the magnification is thus 1.54/2.3 = 0.06. Not exactly true macro photography; you need magnifications greater than 1 for that, but not bad considering how easy it was to get an image that I could blow up quite large in a print. The iPhone 8 does not have optical zoom, so this is the best I can get from my phone.
For comparison, using my Canon EOS 90D DSLR with a 24 – 105 mm lens, the minimum object distances at both ends of the focal length range were about the same at 9 inches, while the zoomed in image was much larger. It measured 1775 pixels out of 4640 pixels (38%) on an APS-C sized sensor, 22.3 x 14.9 mm. The image size was thus 5.7 mm, with a magnification of 0.23 . Better, but still not real macro.
Next, that other lens spec: aperture.

